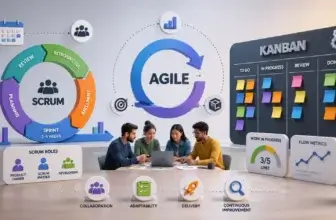
Introduction
Prototyping is the process of turning ideas into tangible models that stakeholders and users can see, click, and experience. It helps answer critical questions early: Does the concept solve the right problem? Is the user flow intuitive? Prototyping reduces uncertainty and saves resources by catching issues before costly development begins. When everyone can see and interact with a prototype, communication becomes clearer, and alignment happens sooner.
Miro is a collaborative online workspace known for its infinite canvas and real‑time collaboration tools. Over the past few years, Miro has expanded beyond digital whiteboarding into product management, diagrams, strategy planning, and, most recently, prototyping. Its AI‑driven features, flexible canvas, and extensive integrations make it an appealing tool for teams looking to ideate, validate, and iterate on product concepts. This article explores how Miro can be used for prototyping, what makes it different from traditional tools, and how to get the most out of its capabilities.
What is Miro, and why does it matter for Prototyping
Miro began as a digital whiteboard, giving teams a shared canvas for brainstorming, mapping processes, and capturing ideas. Over time, it evolved into a full‑fledged collaboration hub with pre‑built templates, diagramming tools, mind maps, presentations, and integration with popular apps. Miro’s real strength lies in keeping everyone on the same page, literally and figuratively. Because it’s cloud‑based, multiple users can contribute simultaneously from anywhere, making it ideal for remote and hybrid teams.
For prototyping, Miro offers a dedicated Miro Prototypes add‑on. This add‑on brings lightweight prototyping directly into the same canvas where discovery and ideation already happen. Instead of switching to separate design tools for early user flows, teams can convert sticky notes, screenshots, or text prompts into interactive prototypes without leaving the board. Miro isn’t aiming to replace high‑fidelity design tools; instead, it focuses on the early, messy stages where speed and collaboration are more important than pixel perfection.
Because Miro Prototypes are native to the canvas, they connect seamlessly with diagrams, notes, roadmaps, and feedback gathered during discovery. This reduces context switching and ensures that everyone, from product managers and engineers to stakeholders, views the same artifact. If your team already uses Miro for workshops or planning, adding prototyping to the mix can shorten the path from idea to validated concept.
Key Features
Software Specification
Miro Prototypes introduces several features that make early prototyping fast and accessible. While it is not a full‑blown design suite, its capabilities are designed to get teams to a testable concept quickly.
AI‑powered Creation
Miro’s AI can turn unstructured information into a draft prototype. You can start with text prompts, sticky notes, screenshots, or even rough sketches. The AI analyzes the content and generates screens with an appropriate layout and components. For example, uploading screenshots of an existing app can produce editable versions that maintain brand elements, allowing you to explore improvements without rebuilding from scratch. This generation capability accelerates the first version of a prototype so you can spend more time iterating and less time setting up.
AI also helps refine prototypes. You can ask the assistant to suggest layout variations, reorganize information, or apply different styles. By conversing with the tool (“What if the navigation moved to the bottom?”), teams can explore multiple directions quickly. This feature is particularly useful when you don’t have dedicated design resources or when you need to validate several options in a workshop.
Drag‑and‑Drop Editing
Once you have a draft, you can customize it with a simple drag‑and‑drop interface. The prototyping add‑on provides a library of editable UI elements, buttons, input fields, cards, menus, and more that you can drop onto the canvas and arrange to suit your flow. Hotspots let you connect screens so stakeholders can click through the journey as if using a real product. Unlike generic flowchart tools, these components are purpose‑built for product flows, giving prototypes a realistic feel without requiring design software. Editable UI components allow you to modify labels, colors, and properties directly on the canvas. You can group screens inside containers to keep the board organized.
Preview and Click‑Through
Prototypes aren’t useful if you can’t experience them. Miro includes a Preview mode that lets anyone click through screens as if using an app or website. When you share the board with stakeholders or test participants, they can follow user flows, interact with buttons and input fields, and provide feedback directly. You can toggle between showing a desktop or mobile frame to simulate different devices. Because the preview lives in the same board, all notes and diagrams remain nearby for reference.
Guided hotspots help direct participants along the intended path. During reviews or usability tests, you can call attention to specific areas, collect comments, and capture feedback in context. Miro’s commenting and reaction features remain available, so discussions stay anchored to the prototype rather than scattered across channels.
Format & Focus Modes
To manage complex boards, Miro offers two complementary modes:
- Format: This mode groups your screens inside a container with adjustable columns and rows. It keeps your prototype organized, maintains equal spacing, and lets you shift groups collectively. The container also supports swimlanes for multi‑variant flows.
- Focus: In Focus mode, the rest of the board fades away so everyone concentrates on the prototype. This is helpful during presentations or user tests because it reduces distractions. When you exit Focus mode, the entire board, including notes, user journeys, and other artifacts, reappears, preserving context.
These modes ensure prototypes remain tidy and easy to follow as they grow.
Refine with AI and Brand Assets
Beyond initial creation, Miro’s AI can help explore alternative layouts, swap colors, or suggest improvements. If you upload a brand logo or color palette, the tool can apply your branding across screens without manual adjustments. This keeps prototypes consistent with corporate guidelines while sparing designers from repetitive work.
AI refinement is iterative; you can toggle between variations, ask for adjustments, and compare versions side by side. When multiple options are generated, the team can vote or comment on favorites directly on the board. This encourages rapid exploration and collective decision‑making.
Starting from Screenshots
Sometimes the easiest way to begin is by reusing what already exists. Miro allows you to import screenshots of apps or websites and convert them into editable mockups. This is useful for iterating on existing products or competitor analyses. Simply upload the screenshot and the AI identifies UI elements and turns them into components you can rearrange, replace or annotate. No original design files are necessary, so anyone can experiment, even if they don’t have access to design tools.
Keeping Momentum and AI Feedback
Prototyping often involves translation of text strings, updating specs, and keeping documents in sync. Miro automates parts of these workflows. For example, AI can translate text between languages in your prototype, ensuring that localized versions stay consistent with the original. Automated updates keep your design, specifications, and documentation aligned so teams don’t waste time searching for the latest version.
Another time saver is AI feedback. You can ask the assistant to review your prototype for accessibility or usability issues. It might suggest increasing color contrast, simplifying navigation, or adjusting element sizes to improve readability. Getting instant feedback helps you iterate before sharing with users or stakeholders, speeding up the refinement loop.
Template Library
Miro’s template library includes AI‑accelerated prototypes for common scenarios such as product onboarding, website flows, mobile apps, and dashboards. Using templates saves time and ensures you follow best practices. Examples include:
- AI Prototype Template: A general template to create product prototypes, conduct usability testing and gather stakeholder feedback.
- Website Prototype Template: A template designed for website flows with modern UI components and responsive layouts.
- Mobile App Prototype Template: A flexible framework that helps you sketch, iterate, and refine mobile apps quickly.
Templates can be customized and combined with your own assets. They provide a starting point, especially for teams new to prototyping or those looking to standardize processes across projects.

Top Benefits
Benefits of Using Miro for Prototyping
Prototyping in Miro offers several advantages over traditional approaches and specialized design tools.
Collaboration from the Start
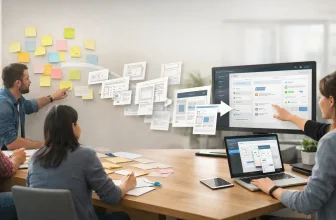
One of the biggest challenges in product development is aligning people with different roles and perspectives. Miro solves this by bringing product managers, designers, engineers, and stakeholders into a single shared workspace. Instead of passing files back and forth, everyone contributes and comments on the same board in real time. You can hold workshops, brainstorming sessions, and prototype reviews without leaving the canvas. Comments, reactions, and voting features make it easy to capture feedback and reach consensus.
Miro also supports asynchronous collaboration. Colleagues in different time zones can log in, review the prototype, and leave their thoughts. Because the entire journey, from research notes to wireframes, is visible, new contributors can catch up quickly without sifting through lengthy documents.
Speed and Efficiency with AI
Traditional prototyping involves creating wireframes manually or switching between tools to build clickable flows. Miro’s AI streamlines these tasks. Generating screens from sticky notes or text prompts lets you go from concept to prototype in minutes. Drag‑and‑drop editing speeds up layout adjustments, while AI suggestions reduce guesswork. Automated translations and feedback cut down on repetitive tasks and ensure your prototype evolves smoothly.
Speed matters because the sooner you test an idea, the less expensive the mistakes become. By compressing the time to a first draft, Miro allows teams to explore more alternatives and iterate multiple times within the same session.
Centralized Workflow & Integrations
Miro acts as a hub where ideation, prototyping, documentation, and planning coexist. You can link user journey maps to screens, attach research notes to specific elements, and embed documents or spreadsheets. Integrations with Slack, Jira, Confluence, Google Workspace, and Microsoft 365 mean you can pull in data or push updates without leaving the board. For example, you might tag a Jira ticket directly on a screen or send notifications to a Slack channel when feedback is needed. Keeping everything in one place reduces tool switching and prevents information from getting lost.
Accessibility for Non‑Designers
Unlike specialized design tools that have a steep learning curve, Miro’s interface is approachable. Product managers, engineers, and other non‑designers can contribute to prototypes without extensive training. Because AI handles many of the design details, teams can focus on structure and content rather than pixel‑perfect layouts. This democratizes prototyping, allowing more people to express their ideas visually and reducing bottlenecks caused by limited design resources.

Best Use Cases
Typical Use Cases and Success Stories
To understand how Miro shines in real‑world scenarios, it helps to look at common use cases and stories from teams that embraced early prototyping.
Discovery Workshops and Early Validation
During the discovery phase, teams generate ideas, cluster insights, and map user journeys. With Miro, you can convert these artifacts into a clickable prototype on the spot. In a workshop, participants might brainstorm features on sticky notes, group them into flows, and then ask Miro’s AI to generate screens. Connecting those screens with hotspots turns rough concepts into something people can interact with. This live prototyping keeps workshops energetic and prevents ideas from languishing on whiteboards.
Usability Testing in Context
Usability testing typically occurs after wireframes are exported to other tools. Miro allows you to conduct early usability checks directly from the board. Simply send a preview link and let users click through. Capture their reactions and observations as comments or sticky notes next to the prototype. Because everything happens in one place, test insights remain visible to the entire team and inform subsequent iterations. This integrated approach shortens feedback loops and encourages continuous improvement.
Stakeholder Alignment
Getting buy‑in from leadership can be challenging when you only have slides or static wireframes. Interactive prototypes created in Miro give stakeholders a tangible artifact to react to. They can try flows themselves, leave comments, and even vote on options. Format and Focus modes help you guide the conversation by zooming in on specific parts of the prototype. Case studies show that prototypes in Miro help teams secure approvals faster and with more confidence because decision makers see how concepts work instead of imagining them.
Concept Validation and Pilot Projects
Sometimes you need to test whether a new concept resonates with users before investing further. Miro is ideal for concept validation because it lets you create interactive prototypes quickly and gather feedback early. Teams have used Miro prototypes to mock up internal tools, product onboarding experiences, dashboards, and mobile apps. Because the prototypes live in the same canvas as research and strategy documents, you can trace decisions back to their origins, valuable for regulated industries or government projects.
Success Stories
Case studies highlight the impact of AI‑assisted prototyping:
- EPAM Systems reduced the time from concept to a reviewable prototype by 99%. Without design resources, a product manager generated wireframes using text prompts and screenshots. Within 30 minutes, she had the screens needed to start discussions. The team now uses Miro prototypes in pre‑sales conversations, with real‑time collaboration replacing weeks of asynchronous feedback.
- Lufthansa Group’s Miles & More program empowered product managers to generate mockups from website screenshots and validate solutions with end users in real time. They reduced alignment cycles from weeks to a single day. Confidence increased because teams could prove ideas visually rather than relying on verbal descriptions.
- Medibank’s digital labs cut innovation cycles from six months to six weeks while aligning more than 80 stakeholders. Early prototypes allowed them to explore different user flows together, turning alignment into a working session instead of a series of meetings.
- Proximie, a healthtech company, used AI‑generated prototypes to experiment with data visualizations for their surgical platform. By asking AI to generate alternate dashboards and adapt views for different roles, they went from prototype to production in record time without slowing down clinical experts.
These stories illustrate how Miro’s prototyping tools unlock speed, collaboration, and confidence across industries.
Lo‑fi vs Hi‑fi Prototypes
Low‑Fidelity vs High‑Fidelity Prototypes in Miro
Understanding fidelity helps you choose the right approach for your project. Miro supports both low‑fidelity (lo‑fi) and high‑fidelity (hi‑fi) prototypes, allowing you to switch as your ideas mature.
Understanding Low‑Fidelity Prototypes
Low‑fidelity prototypes are quick and conceptual representations of your idea. They focus on structure, flow, and basic functionality rather than polished visuals. You can create lo‑fi prototypes by sketching with shapes or using sticky notes to map screens. Their simplicity encourages honest feedback because viewers know nothing is final. They’re ideal for brainstorming, comparing multiple concepts, and validating whether a flow makes sense. In Miro, you can create low‑fidelity prototypes using digital sticky notes, simple shapes, or AI‑generated wireframes. These prototypes are inexpensive to produce and inclusive; anyone can contribute regardless of design experience.
Understanding High‑Fidelity Prototypes
High‑fidelity prototypes aim to look and behave like the final product. They include polished visuals, brand colors, typography, and realistic interactions. Hi‑fi prototypes are useful when you need detailed usability testing, stakeholder buy‑in, or clear developer guidance. While Miro is not intended to replace specialized design tools for pixel‑perfect deliverables, it can produce richer prototypes by linking frames, adding detailed components, and applying your brand assets. High‑fidelity prototypes in Miro are particularly valuable when you want to test interactive flows within the same workspace that hosts your research and planning.
Choosing the Right Fidelity
Deciding between lo‑fi and hi‑fi depends on your goals and project stage. Early in the process, use lo‑fi prototypes to explore ideas rapidly and gather broad feedback. As the concept solidifies, invest in higher fidelity to test specific interactions, aesthetics, and stakeholder reactions. You can start low‑fi in Miro and gradually increase fidelity by refining screens, applying brand elements, and enhancing interactivity. Because all iterations remain on the same board, you keep a history of your design journey.
Low‑Fidelity vs High‑Fidelity Comparison
| Aspect | Low‑Fidelity Prototype | High‑Fidelity Prototype |
| Visual Detail | Basic sketches and simple shapes | Polished visuals, brand colors, typography |
| Interactivity | Limited flows and hotspots | Rich interactions and animations |
| Time to Create | Fast and inexpensive | More time‑consuming |
| Purpose | Concept validation, flow exploration | Usability testing, stakeholder buy‑in |
| Feedback Focus | Structure and overall approach | Specific usability and visual details |
Advantages and Limitations
Pros and Cons of Miro Prototyping
Positive
✅ High‑quality recordings
✅ No downloads for guests
✅ AI‑powered editing
✅ All‑in‑one workflow
Negative
❌ Learning curve
❌ Pricing escalates
❌ Limited offline recording
❌ Customer support feedback
Every tool has strengths and trade‑offs. Understanding these helps you set expectations and choose the right fit.
✅ Pros
- Collaborative from the start: Everyone works on the same board, reducing handoffs and miscommunication.
- Fast ideation with AI: Generate and iterate on prototypes quickly from notes, prompts or screenshots.
- Easy for non‑designers: Drag‑and‑drop editing and AI assistance make prototyping accessible to product managers, engineers and stakeholders.
- Centralized workflows: Keep research, ideation, prototyping and feedback in one place; integrations reduce tool switching.
- Real‑time preview and feedback: Stakeholders can click through flows and leave comments without exporting files.
- Template library: Ready‑made templates accelerate common scenarios and ensure consistency.
❌ Cons
- Requires internet connection: Because Miro is cloud‑based, offline work is limited.
- Performance with large boards: Complex or data‑heavy boards can lag, impacting usability.
- Limited high‑fidelity control: While suitable for early prototypes, pixel‑perfect designs still require specialized tools.
- Learning curve for new users: The breadth of features may overwhelm some users without onboarding.
Despite these drawbacks, many teams find that Miro speeds up early prototyping and improves collaboration, especially when paired with dedicated design software for later stages.
Pricing
Pricing and Plan Considerations
Miro offers several plans: Free, Starter, Business, and Enterprise. Prototyping capabilities are available as an add‑on starting with the Starter plan. According to third‑party analysis, Prototypes was offered to Starter, Business, and Enterprise subscribers in late 2026, and access is controlled by administrators. When evaluating pricing:
Free Plan: Great for personal use or small projects, but lacks advanced features and the Prototypes add‑on.
Starter Plan: Includes core collaboration tools and allows adding the Prototypes feature for a small team. Priced per user per month, billed annually.
Business Plan: Adds advanced security, administration, and integration controls. Suitable for scaling teams and includes access to Prototypes when enabled.
Enterprise Plan: Provides enterprise‑grade security, compliance, and deployment options. Ideal for large organizations needing centralized management and premium support.
If you plan to use Prototypes heavily, ensure your workspace administrator enables the add‑on. Pricing may vary by region and time, so consult Miro’s official site for current details.
Integrations
Integrations and Collaboration Features
Miro’s value extends beyond prototyping; it acts as a nexus for other tools and workflows.
Integrations: Miro connects with popular tools like Slack, Google Workspace, Microsoft 365, Jira, Confluence, Azure DevOps, and Figma. These integrations allow you to import issues, share updates, and embed prototypes in documentation. For example, you can attach a Jira ticket to a screen or send Slack notifications when comments are added.
Real‑Time Collaboration: Multiple users can edit boards simultaneously, making workshops and reviews seamless. Cursor indicators show where team members are working, and built‑in chat, comments, and voting help capture feedback instantly. For asynchronous teams, anyone can leave comments and assign tasks without scheduling meetings.
Cloud‑Based Access: Being browser‑based, Miro works on any device. You can view and test prototypes on desktop or mobile to ensure flows translate across devices. Sharing a board is as simple as sending a link; no need for recipients to install special software.
By centralizing your prototype and connecting it with other tools, Miro reduces friction and ensures that knowledge stays accessible.
Best Practices
Tips and Best Practices for Effective Prototyping in Miro
Making the most of Miro’s prototyping tools requires thoughtful workflow choices. Consider these tips:
Start with Rough Ideas
Begin with low‑fidelity sketches or sticky notes. Use Miro’s AI to turn them into a first draft, then refine. Encourage contributions from all roles, don’t worry about polish at this stage.
Use AI Smartly
AI is a helper, not a replacement for human insight. Ask it to generate screens or suggest alternatives, but evaluate its output critically. Combine AI suggestions with your team’s expertise to arrive at the best solutions.
Leverage Templates and Brand Assets
Start from Miro’s templates for websites, apps, or dashboards. Upload your brand logo and colors so prototypes align with company guidelines. Templates provide structure while still allowing customization.
Keep the Board Organized
Use Format containers to group screens and separate different flows. Create a clear naming convention for frames and components. Consider using the Focus mode during presentations or usability tests to reduce distractions.
Collaborate Early and Often
Invite stakeholders to workshops and review sessions. Encourage them to leave comments and reactions directly on the board. Set up periodic “click‑through” sessions to gather feedback early and avoid surprises later.
Test and Iterate
Share the preview link with users as soon as possible. Capture observations next to the prototype. Iterate based on feedback, and keep all versions on the board to maintain a history of decisions.
Know When to Switch Tools
When your prototype requires detailed visuals, complex animations, or production‑ready assets, hand off your work to a dedicated design tool like Figma or Sketch. Use Miro to align on flows and concepts first; then export screens or reference materials for high‑fidelity design. Maintain links between Miro and your design files to preserve context.

Conclusion
Final thoughts
Miro has evolved into more than a digital whiteboard; it’s an innovation workspace that now includes AI‑assisted prototyping. By keeping ideation, research, and prototyping in one place, Miro shortens the feedback loop and brings teams closer to consensus. Features like AI‑powered generation, drag‑and‑drop editing, preview mode, Format & Focus, and a library of templates make it possible to build interactive prototypes without specialist design skills. Integrations with popular tools and real‑time collaboration capabilities ensure that everyone participates and stays aligned.
Miro Prototypes excels during the early stages of product development, when speed and collaboration matter most. It helps you move from messy ideas to testable solutions, gather feedback, and refine direction before investing in detailed design and development. Combined with strategic practices such as choosing the appropriate fidelity, leveraging AI responsibly, and involving stakeholders early, Miro can significantly accelerate your path to validated products.
Have more questions
Frequently Asked Questions
What is Miro Prototyping?
Miro Prototyping is a feature within Miro that lets you create interactive, clickable prototypes directly on the canvas. It leverages AI, drag-and-drop components, and preview mode to help teams turn ideas into testable flows without switching tools.
How does the AI generation work?
You can feed Miro’s AI text prompts, sticky notes, screenshots, or diagrams. The AI interprets the content and generates screens with appropriate layouts and components. You can then refine the output by asking for variations or rearranging elements manually.
Do I need design skills to use Miro for prototyping?
No. Miro’s prototyping tools are designed for non-designers. Drag-and-drop editing, AI suggestions, and templates allow product managers, engineers, and stakeholders to create prototypes without learning complex design software.
Can I conduct usability tests in Miro?
Yes. Share a preview link with users and let them click through the prototype. Participants can leave comments, and you can capture observations directly on the board. This makes early usability testing faster and more integrated with the rest of your workflow.
Does Miro support high-fidelity prototypes?
Miro supports richer prototypes with branded components and interactive flows, but it’s not intended for pixel-perfect designs. For high-fidelity deliverables, you may want to export your concepts to specialized tools like Figma. Miro excels at early-stage prototyping and collaboration.
What plans include Miro Prototyping?
Prototyping is available as an add-on starting with the Starter plan. Starter, Business, and Enterprise plans can enable Prototypes for their team. Check with your workspace administrator or Miro’s pricing page for up-to-date details.
How does Miro integrate with other tools?
Miro integrates with Slack, Jira, Confluence, Google Workspace, Microsoft 365, and many other tools. You can import tasks, embed prototypes in documents, send notifications, and sync data across your workflow. These integrations reduce context switching and keep information connected.
Are there templates for prototyping in Miro?
Yes. Miro offers AI-accelerated templates such as the AI Prototype Template, Website Prototype Template, and Mobile App Prototype Template. You can customize these templates and reuse them across projects.
How do I involve stakeholders who aren’t familiar with Miro?
Invite them to your board with view or comment permissions. Use the Focus mode to guide them through the prototype without distractions. Encourage them to click through the preview and leave comments. Because Miro is browser-based, stakeholders don’t need to install special software.
Can I export prototypes from Miro?
You can export frames as images or PDFs, and share a direct preview link for interactive demos. For a detailed handoff, you might recreate the final screens in a dedicated design tool. Miro helps you align on flows and content first, then hand off to design or development when you need higher fidelity.